사전 준비
- AWS 계정 생성
- AWS IAM User 생성
- OS에 맞는 aws cli 설치 및 aws configure 설정
1. AWS CloudFormation 배포
AWS CloudFormation은 AWS에서 인프라를 코드로 관리(IaC)할 수 있게 해주는 서비스로, JSON 또는 YAML 형식의 템플릿 파일을 사용해 AWS 리소스를 자동으로 생성하고 관리할 수 있습니다.
1-1. EC2 인스턴스에 접속하기 위한 SSH 키페어 생성
AWS EC2 인스턴스를 만들 때 리눅스 서버에 접속(ssh 로그인) 하기 위해 키페어를 생성합니다. 공개키(Public Key)는 ~/.ssh/authorized_keys 에 등록되어 로컬에서 ssh로 접속가능하게 해줍니다.
- Private Key (.pem 파일) → 로컬 PC에 저장, SSH 접속 시 사용
- Public Key → EC2 인스턴스 생성 시 ~/.ssh/authorized_keys에 자동 등록
aws ec2 create-key-pair --key-name kp-ria --region ap-northeast-2 --query 'KeyMaterial' --output text > kp-ria.pem
chmod 400 kp-ria.pem
mv kp-ria.pem /home/ria/.ssh
aws ec2 describe-key-pairs --region ap-northeast-2
1-2. AWS CloudFormation 배포
root@k3s-s:~$ aws cloudformation deploy --template-file minio-ec2-1node.yaml --stack-name miniolab --parameter-overrides KeyName=kp-ria SgIngressSshCidr=$(curl -s ipinfo.io/ip)/32 --region ap-northeast-2
Waiting for changeset to be created..
Waiting for stack create/update to complete
Successfully created/updated stack - miniolab

1-3. 인스턴스 접속 후 MinIO 환경에 맞는 시스템 튜닝
a. 서버 접속
ssh -i ~/.ssh/kp-ria.pem ubuntu@$(aws cloudformation describe-stacks --stack-name miniolab --query 'Stacks[*].Outputs[0].OutputValue' --output text --region ap-northeast-2)


b. 시스템 튜닝
- fio - 벤치마크/부하 테스트 툴
- tuned - CPU, 디스크 I/O, 네트워크, 전원 관리 설정을 자동으로 조정해 리눅스 시스템 성능을 목적에 맞게 최적화
[튜닝 전]
root@k3s-s:~$ fio --name=randrw_test \
  --filename=/mnt/testfile \
  --size=4G \
  --rw=randrw \
  --rwmixread=70 \
  --bs=4k \
  --iodepth=16 \
  --numjobs=4 \
  --time_based \
  --runtime=60 \
  --group_reporting
read: IOPS=2440, BW=9762KiB/s (9997kB/s)(572MiB/60003msec)
write: IOPS=1053, BW=4215KiB/s (4316kB/s)(247MiB/60003msec); 0 zone resets
Disk stats (read/write):
nvme1n1: ios=135639/47096, sectors=1085112/396600, merge=0/3, ticks=233924/146164, in_queue=380088, util=87.85%
[튜닝 후]
- Current active profile : virtual-guest
tuned-adm profile virtual-guest
tuned-adm active
read: IOPS=2468, BW=9875KiB/s (10.1MB/s)(579MiB/60002msec)

write: IOPS=1065, BW=4263KiB/s (4366kB/s)(250MiB/60002msec); 0 zone resets

Disk stats (read/write):
  nvme1n1: ios=137061/45282, sectors=1096488/386312, merge=0/20, ticks=233296/141159, in_queue=374454, util=89.50%
- Current active profile : throughput-performance
tuned-adm profile throughput-performance
tuned-adm active
read: IOPS=2381, BW=9526KiB/s (9754kB/s)(558MiB/60003msec)

write: IOPS=1027, BW=4112KiB/s (4210kB/s)(241MiB/60003msec); 0 zone resets

Disk stats (read/write):
  nvme0n1: ios=132620/50094, sectors=1060960/425056, merge=0/16, ticks=232970/157287, in_queue=390257, util=88.77%
** IOPS와 대역폭을 보면 튜닝 전후 성능 차이 거의 없음
C. MinIO 권장 커널 파라미터 튜닝
Software Checklist — MinIO Object Storage (AGPLv3)
Software Checklist — MinIO Object Storage (AGPLv3)
Software Checklist Table of Contents Use the following checklist when planning the software configuration for a production, distributed MinIO deployment. Servers running a Linux operating system with a 6.6+ kernel. Red Hat Enterprise Linux (RHEL) 10 or Ubu
docs.min.io
2. DirectPV 설치
2-1. directpv 설치 및 리소스 확인
kubectl krew install directpv
kubectl directpv install

root@k3s-s:~$ kubectl get crd | grep min
directpvdrives.directpv.min.io         2025-09-20T01:30:08Z
directpvinitrequests.directpv.min.io   2025-09-20T01:30:09Z
directpvnodes.directpv.min.io          2025-09-20T01:30:09Z
directpvvolumes.directpv.min.io        2025-09-20T01:30:09Z

root@k3s-s:~$ kubectl get-all -n directpv
NAME                                                        NAMESPACE  AGE
configmap/kube-root-ca.crt                                  directpv   2m46s
pod/controller-784c49d5fd-jvtf4                             directpv   2m45s
pod/controller-784c49d5fd-mm6dr                             directpv   2m45s
pod/controller-784c49d5fd-nxgsl                             directpv   2m45s
pod/node-server-r6zvq                                       directpv   2m45s
serviceaccount/default                                      directpv   2m46s
serviceaccount/directpv-min-io                              directpv   2m46s
controllerrevision.apps/node-server-74664bdcc8              directpv   2m45s
daemonset.apps/node-server                                  directpv   2m45s
deployment.apps/controller                                  directpv   2m45s
replicaset.apps/controller-784c49d5fd                       directpv   2m45s
lease.coordination.k8s.io/directpv-min-io                   directpv   2m26s
lease.coordination.k8s.io/external-resizer-directpv-min-io  directpv   2m25s
rolebinding.rbac.authorization.k8s.io/directpv-min-io       directpv   2m46s
role.rbac.authorization.k8s.io/directpv-min-io              directpv   2m46s

root@k3s-s:~$ kubectl directpv discover

 Discovered node 'k3s-s' ✔

┌─────────────────────┬───────┬─────────┬────────┬────────────┬────────────────────────────┬───────────┬─────────────┐
│ ID                  │ NODE  │ DRIVE   │ SIZE   │ FILESYSTEM │ MAKE                       │ AVAILABLE │ DESCRIPTION │
├─────────────────────┼───────┼─────────┼────────┼────────────┼────────────────────────────┼───────────┼─────────────┤
│ 259:2$GpDz5Au6J1... │ k3s-s │ nvme0n1 │ 30 GiB │ -          │ Amazon Elastic Block Store │ YES       │ -           │
│ 259:3$vPXi+MUugY... │ k3s-s │ nvme2n1 │ 30 GiB │ -          │ Amazon Elastic Block Store │ YES       │ -           │
│ 259:0$kNtiw0q6Yv... │ k3s-s │ nvme3n1 │ 30 GiB │ -          │ Amazon Elastic Block Store │ YES       │ -           │
│ 259:1$tnErPUalKp... │ k3s-s │ nvme4n1 │ 30 GiB │ -          │ Amazon Elastic Block Store │ YES       │ -           │
└─────────────────────┴───────┴─────────┴────────┴────────────┴────────────────────────────┴───────────┴─────────────┘

Generated 'drives.yaml' successfully.
2-2. directpv에 사용할 드라이브 선택
vi drives.yaml
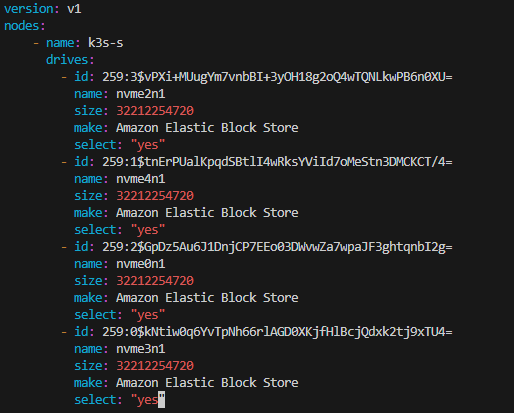
(사용 안하는 드라이브는 select: "no"로 수정 후 배포)
2-3. directpv 초기화
kubectl directpv init drives.yaml --dangerous
kubectl directpv list drives
kubectl directpv info

2-4. directpv 사용 예시 (nginx app 배포 후 볼륨 데이터 저장 확인)
a.nginx pod 배포
cat << EOF | kubectl apply -f -
apiVersion: v1
kind: PersistentVolumeClaim
metadata:
  name: nginx-pvc
spec:
  volumeMode: Filesystem
  storageClassName: directpv-min-io
  accessModes: [ "ReadWriteOnce" ]
  resources:
    requests:
      storage: 8Mi
---
apiVersion: v1
kind: Pod
metadata:
  name: nginx-pod
spec:
  volumes:
    - name: nginx-volume
      persistentVolumeClaim:
        claimName: nginx-pvc
  containers:
    - name: nginx-container
      image: nginx:alpine
      volumeMounts:
        - mountPath: "/mnt"
          name: nginx-volume
EOF
b. directpv 볼륨 마운트 경로에 파일 저장 확인
root@k3s-s:~$ kubectl exec -it nginx-pod -- sh -c 'echo hello > /mnt/hello.txt'
root@k3s-s:~$ kubectl exec -it nginx-pod -- sh -c 'cat /mnt/hello.txt'
hello
c. 확인 후 nginx 삭제 (마운트 해제 완료)

2-5. directpv label을 활용하여 StorageClass 내 특정 드라이브 선택
a. nvme0n1드라이브에 "tier-fast" 라벨 생성
root@k3s-s:~$ kubectl directpv label drives --drives=nvme0n1 tier=fast
Label 'directpv.min.io/tier:fast' successfully set on k3s-s/nvme0n1

root@k3s-s:~$ kubectl directpv list drives --show-labels
┌───────┬─────────┬────────────────────────────┬────────┬────────┬─────────┬────────┬───────────┐
│ NODE  │ NAME    │ MAKE                       │ SIZE   │ FREE   │ VOLUMES │ STATUS │ LABELS    │
├───────┼─────────┼────────────────────────────┼────────┼────────┼─────────┼────────┼───────────┤
│ k3s-s │ nvme0n1 │ Amazon Elastic Block Store │ 30 GiB │ 30 GiB │ -       │ Ready  │ tier=fast │
│ k3s-s │ nvme2n1 │ Amazon Elastic Block Store │ 30 GiB │ 30 GiB │ -       │ Ready  │ -         │
│ k3s-s │ nvme3n1 │ Amazon Elastic Block Store │ 30 GiB │ 30 GiB │ -       │ Ready  │ -         │
│ k3s-s │ nvme4n1 │ Amazon Elastic Block Store │ 30 GiB │ 30 GiB │ -       │ Ready  │ -         │
└───────┴─────────┴────────────────────────────┴────────┴────────┴─────────┴────────┴───────────┘
b. "tier-fast" 라벨이 붙은 드라이브만 사용하는 새로운 StorageClass 생성 -> fast-tier-storage
vi create-storage-class.sh
kubectl get sc
chmod +x create-storage-class.sh
./create-storage-class.sh fast-tier-storage 'directpv.min.io/tier: fast'

c. nginx pod 배포 (StorageClass : fast-tier-storage)
root@k3s-s:~$ cat << EOF | kubectl apply -f -
apiVersion: v1
kind: PersistentVolumeClaim
metadata:
  name: nginx-pvc
spec:
  volumeMode: Filesystem
  storageClassName: fast-tier-storage
  accessModes: [ "ReadWriteOnce" ]
  resources:
    requests:
      storage: 8Mi
---
apiVersion: v1
kind: Pod
metadata:
  name: nginx-pod
spec:
  volumes:
    - name: nginx-volume
      persistentVolumeClaim:
        claimName: nginx-pvc
  containers:
    - name: nginx-container
      image: nginx:alpine
      volumeMounts:
        - mountPath: "/mnt"
          name: nginx-volume
EOF
persistentvolumeclaim/nginx-pvc created
pod/nginx-pod created
d. "tier-fast" 라벨을 가진 nvme0n1 드라이브만 할당됨
root@k3s-s:~$ kubectl get pvc,pv,directpvvolumes
NAME                              STATUS   VOLUME                                     CAPACITY   ACCESS MODES   STORAGECLASS        VOLUMEATTRIBUTESCLASS   AGE
persistentvolumeclaim/nginx-pvc   Bound    pvc-8f44bc3d-c84e-4233-8a9f-35c274cbbe93   8Mi        RWO            fast-tier-storage   <unset>                 4m7s

NAME                                                        CAPACITY   ACCESS MODES   RECLAIM POLICY   STATUS   CLAIM               STORAGECLASS        VOLUMEATTRIBUTESCLASS   REASON   AGE
persistentvolume/pvc-8f44bc3d-c84e-4233-8a9f-35c274cbbe93   8Mi        RWO            Delete           Bound    default/nginx-pvc   fast-tier-storage   <unset>                          4m7s

NAME                                                                      AGE
directpvvolume.directpv.min.io/pvc-8f44bc3d-c84e-4233-8a9f-35c274cbbe93   4m7s

root@k3s-s:~$ lsblk
NAME         MAJ:MIN RM  SIZE RO TYPE MOUNTPOINTS
loop0          7:0    0 73.9M  1 loop /snap/core22/2111
loop1          7:1    0 27.6M  1 loop /snap/amazon-ssm-agent/11797
loop2          7:2    0 50.8M  1 loop /snap/snapd/25202
loop3          7:3    0   16M  0 loop
nvme3n1      259:0    0   30G  0 disk /var/lib/directpv/mnt/b02ac23e-8327-4f17-9c4a-be53a05d2142
nvme4n1      259:1    0   30G  0 disk /var/lib/directpv/mnt/ec98fe1e-799f-4dad-b161-ccda242d73f4
nvme0n1      259:2    0   30G  0 disk /var/lib/kubelet/pods/72524a84-5890-47a5-b68c-9abc70578c46/volumes/kubernetes.io~csi/pvc-8f44bc3d-c84e-4233-8a9f-35c274cbbe93/mount
                                      /var/lib/kubelet/plugins/kubernetes.io/csi/directpv-min-io/f2123391d979a200fa3ce361dd5ab67991a5cb7b8c0082abed45e140651b7f2b/globalmount
                                      /var/lib/directpv/mnt/ca10f20a-4621-4936-824b-1dbf1d28801f
nvme2n1      259:3    0   30G  0 disk /var/lib/directpv/mnt/feb86b3a-e7f7-4f56-9bd0-8bd71f324f97
nvme1n1      259:4    0   30G  0 disk
├─nvme1n1p1  259:5    0   29G  0 part /
├─nvme1n1p14 259:6    0    4M  0 part
├─nvme1n1p15 259:7    0  106M  0 part /boot/efi
└─nvme1n1p16 259:8    0  913M  0 part /boot
3. MinIO 설치
3-1. helm을 사용하여 minio 배포
root@k3s-s:~$ helm repo add minio-operator https://operator.min.io
"minio-operator" has been added to your repositories

root@k3s-s:~# cat << EOF > minio-operator-values.yaml
 operator:
   env:
   - name: MINIO_OPERATOR_RUNTIME
     value: "Rancher"
   replicaCount: 1
 EOF

root@k3s-s:~$ helm install --namespace minio-operator --create-namespace minio-operator minio-operator/operator --values minio-operator-values.yaml
NAME: minio-operator
LAST DEPLOYED: Sat Sep 20 11:20:35 2025
NAMESPACE: minio-operator
STATUS: deployed
REVISION: 1
TEST SUITE: None
3-2. MinIO 서버 내 tenant 생성
root@k3s-s:~$ cat << EOF > minio-tenant-1-values.yaml
tenant:
  name: tenant1

  configSecret:
    name: tenant1-env-configuration
    accessKey: minio
    secretKey: minio123

  pools:
    - servers: 1
      name: pool-0
      volumesPerServer: 4
      size: 10Gi
      storageClassName: directpv-min-io
  env:
    - name: MINIO_STORAGE_CLASS_STANDARD
      value: "EC:1"

  metrics:
    enabled: true
    port: 9000
    protocol: http
EOF

root@k3s-s:~$ helm install --namespace tenant1 --create-namespace --values minio-tenant-1-values.yaml tenant1 minio-operator/tenant \
>  && kubectl get tenants -A -w
NAME: tenant1
LAST DEPLOYED: Sat Sep 20 11:22:45 2025
NAMESPACE: tenant1
STATUS: deployed
REVISION: 1
TEST SUITE: None
NAMESPACE   NAME      STATE   HEALTH   AGE
tenant1     tenant1                    0s
tenant1     tenant1                    5s
tenant1     tenant1                    5s
tenant1     tenant1   Waiting for MinIO TLS Certificate            5s
tenant1     tenant1   Provisioning MinIO Cluster IP Service            15s
tenant1     tenant1   Provisioning Console Service                     15s
tenant1     tenant1   Provisioning MinIO Headless Service              15s
tenant1     tenant1   Provisioning MinIO Headless Service              16s
tenant1     tenant1   Provisioning MinIO Statefulset                   16s
tenant1     tenant1   Provisioning MinIO Statefulset                   16s
tenant1     tenant1   Provisioning MinIO Statefulset                   17s
tenant1     tenant1   Waiting for Tenant to be healthy                 17s
tenant1     tenant1   Waiting for Tenant to be healthy        green    32s
tenant1     tenant1   Waiting for Tenant to be healthy        green    32s
tenant1     tenant1   Initialized                             green    35s
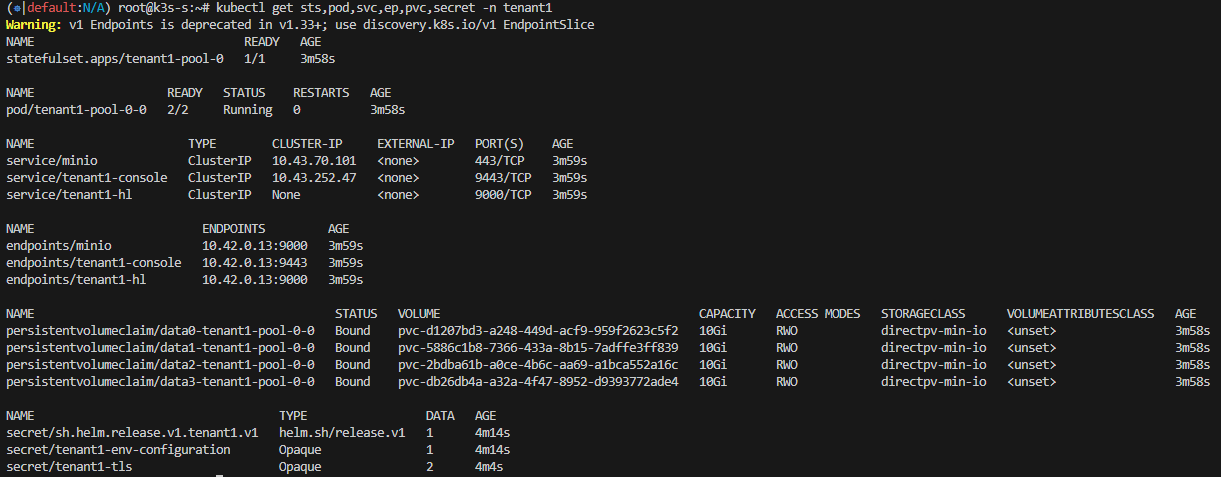
3-3. tenant 리소스 생성 확인


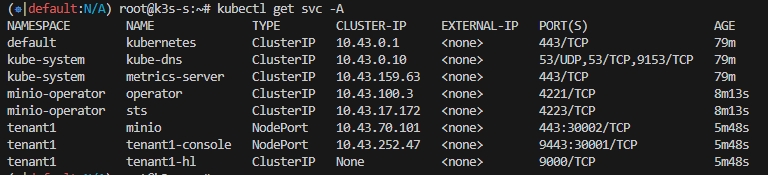
3-4. 서비스 NodePort 설정
- minio 콘솔 접속을 위한 포트 설정
kubectl patch svc -n tenant1 tenant1-console -p '{"spec": {"type": "NodePort", "ports": [{"port": 9443, "targetPort": 9443, "nodePort": 30001}]}}'
- 클러스터 내부 접속을 위한 포트 설정
kubectl patch svc -n tenant1 minio -p '{"spec": {"type": "NodePort", "ports": [{"port": 443, "targetPort": 9000, "nodePort": 30002}]}}'
3-5. tenant alias 등록
root@k3s-s:~$ mc alias set k8s-tenant1 https://127.0.0.1:30002 minio minio123 --insecure
Added `k8s-tenant1` successfully.

root@k3s-s:~$ mc alias list
...
k8s-tenant1
  URL       : https://127.0.0.1:30002
  AccessKey : minio
  SecretKey : minio123
  API       : s3v4
  Path      : auto
  Src       : /root/.mc/config.json
...
3-6. 버킷 생성 및 객체 크기에 따른 multipart upload 확인
a. 버킷 생성
root@k3s-s:~$ mc mb k8s-tenant1/mybucket --insecure
Bucket created successfully `k8s-tenant1/mybucket`.

root@k3s-s:~$ mc ls --summarize --recursive --versions k8s-tenant1 --insecure
[2025-09-20 12:04:29 KST]     0B mybucket/

Total Size: 0 B
Total Objects: 1- 비어있는 버켓이지만 객체 사이즈 1인 이유
=> 빈 버킷을 생성하면 내부적으로 버킷 정보를 담은 메타데이터 엔트리 자동 생성
b. 100MB 파일 업로드 테스트
** MinIO Multipart Upload 방식 **
Multipart Upload는 큰 파일을 여러 조각(part)으로 나눠 업로드하는 방식입니다.
각 조각은 UploadId와 PartNumber로 구분되어 병렬로 전송할 수 있고,
모든 조각 업로드가 완료되면 MinIO는 조각들을 합쳐 최종 객체를 생성합니다.
[Client] ------CreateMultipartUpload---> [MinIO]
<----------- UploadId ---------------
[Client] -------UploadPart(part1)--------> [MinIO]
[Client] -------UploadPart(part2)--------> [MinIO]
[Client] -------UploadPart(part3)--------> [MinIO]
...
[Client] ---CompleteMultipartUpload--> [MinIO]
<------- OK + Final Object -------
- 100MB 파일 생성 후 버킷에 저장
root@k3s-s:~$ </dev/urandom tr -dc 'A-Za-z0-9' | head -c 100M > randtext.txt

root@k3s-s:~$ mc cp ./randtext.txt k8s-tenant1/mybucket/ --insecure
 0 B / ? ┃░░░░░░░░░░░░░░░░░░░░░░░░░░░░░░░░░░░░░░░░░░░░░░░░░░░░░░░░░░░▓┃
 /root/randtext.txt:  100.00 MiB / 100.00 MiB ┃▓▓▓▓▓▓▓▓▓▓▓▓▓▓▓▓▓▓▓▓▓▓▓┃ 356.58 MiB/s 0s
- k8s-tenant1 서버 로그 실시간 확인
mc admin trace -v -a k8s-tenant1 --insecure
case 1) mc cp ./randtext.txt k8s-tenant1/mybucket/ --insecure
=> s3.NewMultipartUpload (multipart upload)

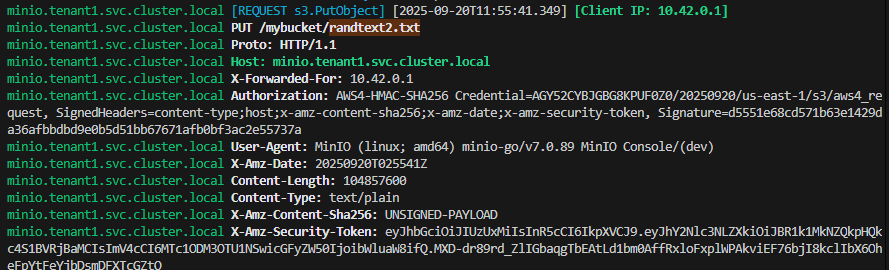
case 2) mc cp ./randtext.txt k8s-tenant1/mybucket/ --insecure --disable-multipart
=> s3.PutObject (single upload)

case 3) minio 웹 콘솔에서 파일 업로드
=> s3.PutObject (single upload)
Directpv 볼륨 확장 테스트
1. 파드 재기동 없이 볼륨 10GiB → 20GiB 확장
[확장 전]
root@k3s-s:~$ kubectl directpv list drives
┌───────┬─────────┬────────────────────────────┬────────┬────────┬─────────┬────────┐
│ NODE  │ NAME    │ MAKE                       │ SIZE   │ FREE   │ VOLUMES │ STATUS │
├───────┼─────────┼────────────────────────────┼────────┼────────┼─────────┼────────┤
│ k3s-s │ nvme0n1 │ Amazon Elastic Block Store │ 30 GiB │ 20 GiB │ 1       │ Ready  │
│ k3s-s │ nvme2n1 │ Amazon Elastic Block Store │ 30 GiB │ 20 GiB │ 1       │ Ready  │
│ k3s-s │ nvme3n1 │ Amazon Elastic Block Store │ 30 GiB │ 20 GiB │ 1       │ Ready  │
│ k3s-s │ nvme4n1 │ Amazon Elastic Block Store │ 30 GiB │ 20 GiB │ 1       │ Ready  │
└───────┴─────────┴────────────────────────────┴────────┴────────┴─────────┴────────┘

root@k3s-s:~$ kubectl directpv info
┌─────────┬──────────┬───────────┬─────────┬────────┐
│ NODE    │ CAPACITY │ ALLOCATED │ VOLUMES │ DRIVES │
├─────────┼──────────┼───────────┼─────────┼────────┤
│ • k3s-s │ 120 GiB  │ 40 GiB    │ 4       │ 4      │
└─────────┴──────────┴───────────┴─────────┴────────┘

40 GiB/120 GiB used, 4 volumes, 4 drives
[확장 후]
root@k3s-s:~$ kubectl patch pvc -n tenant1 data0-tenant1-pool-0-0 -p '{"spec":{"resources":{"requests":{"storage":"20Gi"}}}}'
persistentvolumeclaim/data0-tenant1-pool-0-0 patched

root@k3s-s:~$ kubectl patch pvc -n tenant1 data1-tenant1-pool-0-0 -p '{"spec":{"resources":{"requests":{"storage":"20Gi"}}}}'
persistentvolumeclaim/data1-tenant1-pool-0-0 patched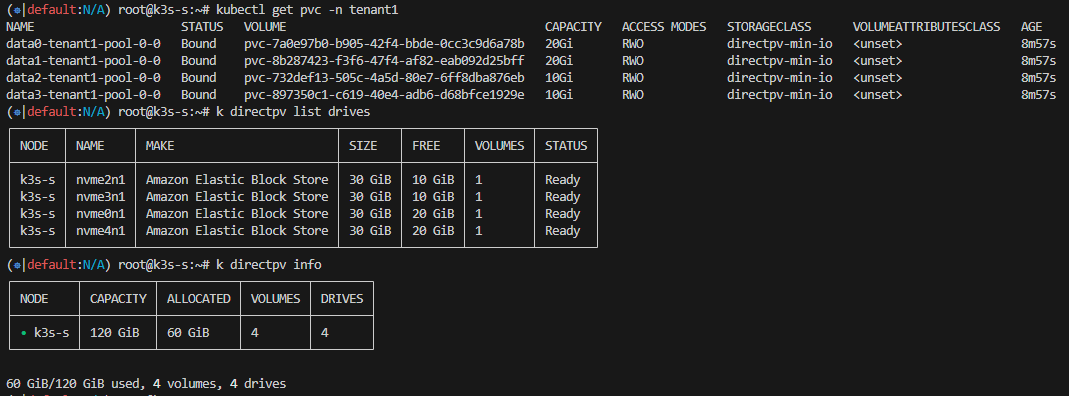
2. AWS EBS 볼륨 30GiB → 50GiB 로 확장 (실패)
- 볼륨 크기 수정 (30GiB -> 50GiB)


- directpv 드라이브 사이즈 변화 확인
방법 1) node-server 재시작 (kubectl delete pod) => 변화없음
방법 2) 서버 Reboot => 변화없음

** 디스크 볼륨 확장 시, 새 디스크 장착 권장 (kubectl directpv discover, init 사용)
WARP로 MinIO 성능 테스트 (K8S Job)
1. MinIO Write 성능 확인
- warp-put-job.yaml 생성 후 배포
apiVersion: batch/v1
kind: Job
metadata:
  name: warp-put-job
  namespace: tenant1
spec:
  template:
    spec:
      containers:
      - name: warp-put
        image: minio/warp:latest
        imagePullPolicy: Always
        env:
          - name: WARP_ACCESS_KEY
            value: "minio"
          - name: WARP_SECRET_KEY
            value: "minio123"
          - name: WARP_ENDPOINT
            value: "tenant1-pool-0-0.tenant1-hl.tenant1.svc.cluster.local:9000"
        args:
          - put
          - --bucket
          - mybucket
          - --tls
          - --obj.size
          - 1MiB
          - --duration
          - 2m
          - --concurrent
          - "32"
      restartPolicy: Never
  backoffLimit: 4
root@k3s-s:~/warp$ kubectl get pods -w
NAME READY STATUS RESTARTS AGE
warp-put-job-v9t5h 1/1 Running 0 2m11s
warp-put-job-v9t5h 0/1 Completed 0 2m12s- 성능 결과
kubectl logs warp-put-job-v9t5h


2. MinIO Read성능 확인
- warp-get-job.yaml 생성 후 배포
apiVersion: batch/v1
kind: Job
metadata:
  name: warp-get-job
  namespace: tenant1
spec:
  template:
    spec:
      containers:
      - name: warp-get
        image: minio/warp:latest
        imagePullPolicy: Always
        env:
          - name: WARP_ACCESS_KEY
            value: "minio"
          - name: WARP_SECRET_KEY
            value: "minio123"
          - name: WARP_ENDPOINT
            value: "tenant1-pool-0-0.tenant1-hl.tenant1.svc.cluster.local:9000"
        args:
          - get
          - --bucket
          - mybucket
          - --tls
          - --obj.size
          - 1MiB
          - --duration
          - 2m
          - --concurrent
          - "32"
      restartPolicy: Never
  backoffLimit: 4
root@k3s-s:~$ kubectl get job -w
NAME STATUS COMPLETIONS DURATION AGE
warp-get-job Running 0/1 2m21s 2m21s
warp-get-job Complete 1/1 2m21s 2m21s- 성능 결과
kubectl logs warp-get-job-z7sct


'MinIO' 카테고리의 다른 글
| [MinIO] Rack Awareness: StorageClass,PVC를 활용한 분산 배치 적용 (0) | 2025.09.26 |
|---|---|
| [MinIO] mc(minio client) 사용법 (0) | 2025.09.14 |

